Introduction
Automation has become essential for mobile app testing, and Appium has emerged as a top tool in this space. This open-source framework supports both iOS and Android, letting users write tests in familiar programming languages like Python, Java, or JavaScript using WebDriver protocols—all without changing the app's code through it's "no-instrumentation" approach.
Appium works through a client-server setup that handles native, hybrid, and web apps. Your tests communicate with an Appium server on your development machine or continuous integration (CI) environment, which converts commands into platform-specific frameworks like XCTest for Apple platforms (iOS, iPadOS, and tvOS). This standardization makes Appium valuable for both security teams and quality assurance (QA) engineers.
Corellium offers a revolutionary approach to mobile device virtualization, bringing a unique advantage for mobile testing—virtual device replicas running at near-native speeds available remotely. Unlike standard simulators or physical stock devices, Corellium supports jailbroken virtual devices, providing unprecedented access to the operating system. This makes it powerful for security research and penetration testing, while still supporting development and QA needs.
Together, these tools can transform iOS testing. Teams can create exact iOS device copies (including jailbroken versions), run parallel tests, and reset devices instantly without device management headaches.
The integration delivers significant benefits: scalability by spinning up exactly the devices you need, consistency through clean testing environments, flexibility to test against various iOS versions, and deeper security testing through jailbroken access. For teams with CI pipelines, this combination removes the bottlenecks often associated with physical device testing.
This guide takes a practical approach to combining Appium with Corellium. We'll skip excessive theory and focus on real applications—from basic smoke tests to complex user flows in production apps. We'll cover everything from environment setup to advanced testing scenarios, with code examples you can adapt to your projects. Whether you're new to mobile automation or enhancing your current framework, you'll get actionable insights for building better mobile tests.
Setting up Appium on Corellium
Before diving into mobile automation, you'll need to set up your environment properly. This section walks you through the prerequisites, installation steps, and verification process.
Prerequisites
To successfully set up Appium with Corellium, you will need the following:
System Requirements
- Computer running macOS or Linux
- Configured Corellium virtual machine running jailbroken iOS
Necessary Tools
Installation and Setup
-
First, you'll need to install Appium on your local machine:
npm i -g appium -
Next, you'll need to install the XCUITest driver, which enables automating iOS applications using Apple's XCTest framework:
appium driver install xcuitest - Next, you'll need to set up your Corellium virtual machine for the WebDriverAgent. Launch your jailbroken Corellium VM and ensure it's fully booted.
- Ensure that active USB and VPN connections are present for the Corellium VM using USBFlux and a VPN client of your choice by accessing the 'Connect' tab on the web interface:

- After connecting to the virtual machine using the provided OVPN file, open USBFlux and it should display that a remote device is connected:

- Forward port 8100 using the 'Port Forwarding' tab with 'Use first available port' unchecked and 'Expose port' checked. The WebDriverAgent relies on port 8100 for its communication:

-
Download the WebDriverAgent IPA:
-
In the 'Apps' tab on the web interface, click on 'Install app' and choose the IPA:

-
On your local machine, install
pymobiledevice3andlibusb. These will be used to mount a Developer Disk Image to the Corellium VM to ensure theXCTestframework is present:python3 -m pip install -U pymobiledevice3 && brew install libusb -
Mount the Developer Disk Image:
pymobiledevice3 mounter auto-mount
Verifying Installation
To confirm the WebDriverAgent is running correctly on your Corellium VM, first open the IPA in the VM, then on your local machine, execute:
curl http://10.11.1.1:8100/statusYou should receive a JSON response indicating that the WebDriverAgent is running properly. This confirms that Appium can communicate with the WebDriverAgent on your Corellium VM.
If the installation is successful, you should see output similar to:
{
  "value" : {
    "build" : {
      "version" : "8.12.0",
      "time" : "Jan 17 2025 18:27:05",
      "productBundleIdentifier" : "com.facebook.WebDriverAgentRunner"
    },
    "os" : {
      "testmanagerdVersion" : 65535,
      "name" : "iOS",
      "sdkVersion" : "18.0",
      "version" : "18.3.1"
    },
    "device" : "iphone",
    "ios" : {
      "ip" : "10.11.0.1"
    },
    "message" : "WebDriverAgent is ready to accept commands",
    "state" : "success",
    "ready" : true
  },
  "sessionId" : null
}
Smoke Test: Opening the Files App
Let's start with a simple smoke test to ensure our setup is working correctly. We'll write a basic script that opens the Files app on iOS.
Writing a Basic Script
First you will need to install the client of your choice, for this blog, we'll be using Appium's Python client:
pip install Appium-Python-Client
Next, create a new file called documents.py with the following content, replacing the labeled settings as appropriate:
from appium import webdriver
from appium.options.ios import XCUITestOptions

options = XCUITestOptions()
options.automation_name = 'XCUITest'

# Unique to device
options.udid = '00008120E2B0B8724249DA6D' # UDID
options.device_name = "appium-demo" # Name
options.platform_name = 'iOS'
options.platform_version = '18.3.1' # iOS version

# WDA settings
options.set_capability('webDriverAgentUrl', 'http://10.11.1.1:8100') # Services IP of Corellium device
options.set_capability('usePreinstalledWDA', True)
options.set_capability('updatedWDABundleId', 'org.appium.WebDriverAgentRunner')
options.set_capability('updatedWDABundleIdSuffix', '.xctrunner')

# App settings
options.bundle_id = 'com.apple.DocumentsApp' # Bundle ID of target application (Files.app)

try:
    driver = webdriver.Remote('http://127.0.0.1:4723', options=options)
    print('Successfully loaded Files')

except Exception as e:
    print(f"Error occurred: {str(e)}")
    print(f"Error type: {type(e)}")

finally:
    driver.terminate_app('com.apple.DocumentsApp')
    driver.quit()
Make sure to edit the options.udid, options.device_name, options.platform_version, and the IP address fields to match your Corellium VM.
This script performs a simple interaction with the Files app:
- Launches the Files app
- Waits for it to load
- Closes the session
Running the Test and Verifying the Results
To run the test, start the Appium server on your local machine by running:
appium
In a separate terminal, execute:
python3 documents.py
On your Corellium VM, you should visually see the Files app open then close, returning to the home screen.
This smoke test confirms that:
- Appium is properly installed on your machine
- WebDriverAgent is running correctly on the Corellium VM
- Communication between Appium and Corellium is working
- Basic automation commands are being executed successfully
Automating Real-World Applications
Now that we've covered a basic smoke test, let's tackle automating a real-world application. We'll use Facebook as an example to demonstrate how to automate common user flows.
Automating Facebook
Production apps like Facebook have complex, frequently changing UIs that can be challenging to automate. Appium Inspector is an invaluable tool for discovering the correct selectors in such applications.
Create a new file called facebook.py with the following contents:
from appium import webdriver
from appium.options.ios import XCUITestOptions
from appium.webdriver.common.appiumby import AppiumBy
from selenium.webdriver.support.ui import WebDriverWait
from selenium.webdriver.support import expected_conditions as EC

options = XCUITestOptions()
options.automation_name = 'XCUITest'

# Unique to device
options.udid = '00008120E2B0B8724249DA6D' # UDID
options.device_name = "appium-demo" # Name
options.platform_name = 'iOS'
options.platform_version = '18.3.1' # iOS version

# WDA settings
options.set_capability('webDriverAgentUrl', 'http://10.11.1.1:8100') # Services IP of Corellium device
options.set_capability('usePreinstalledWDA', True)
options.set_capability('updatedWDABundleId', 'org.appium.WebDriverAgentRunner')
options.set_capability('updatedWDABundleIdSuffix', '.xctrunner')

# App settings
options.bundle_id = 'com.facebook.Facebook' # Bundle ID of target application
options.set_capability('autoAcceptAlerts', True) # Automatically accepts permission requests

try:
    driver = webdriver.Remote('http://127.0.0.1:4723', options=options)
    print("Connected to Facebook")

    wait = WebDriverWait(driver, 20)

except Exception as e:
    print(f"Error occurred: {str(e)}")
    print(f"Error type: {type(e)}")
Using Appium Inspector to find UI Elements
Before writing our automation script further, we can use Appium Inspector to identify the UI elements we need to interact with. This visual tool helps us locate accurate selectors, making our automation more reliable.
Connect Appium Inspector to your Corellium VM with Facebook installed:
- Install the relevant Appium Inspector for your platform
- Start Appium Inspector and head over to the 'Attach to Session…' tab:

- Start the Appium Server on your local machine:
appium 4. In a different terminal:
python3 facebook.py 5. Before the script finishes, reload the session drop down menu in Appium Inspector: The session ID should be present, click on 'Attach to Session'
Logging into a Facebook Account
Once connected, you should be able to observe the element hierarchy, as well as specific UI elements once clicked on.
For the login process, we can obtain the following UI fields for their accessibility IDs:
- Email field
- Password field
- Login button
Click on the desired UI element to interact with:  After doing so, the accessibility ID under 'Find By' will be listed under 'Selector', which is 'Mobile number or email'.
Do the same for the rest of the fields:

 Now we can update the script:
try:
    driver = webdriver.Remote('http://127.0.0.1:4723', options=options)
    print("Connected to Facebook")

    wait = WebDriverWait(driver, 20)

    email_field = wait.until(
        EC.presence_of_element_located((AppiumBy.ACCESSIBILITY_ID, "Mobile number or email"))
    )
    email_field.send_keys("example@example.com")
    print("Entered email")

    password_field = wait.until(
        EC.presence_of_element_located((AppiumBy.ACCESSIBILITY_ID, "Password"))
    )
    password_field.send_keys("password")
    print("Entered password")

    login_button = wait.until(
        EC.presence_of_element_located((AppiumBy.ACCESSIBILITY_ID, "Log in"))
    )
    login_button.click()
    print("Clicked login button")

except Exception as e:
    print(f"Error occurred: {str(e)}")
    print(f"Error type: {type(e)}")
By creating variables (email_field, password_field, login_button) and having them wait until the accessibility ID is present, much of the common difficulties with timing-based scripting are alleviated.
The send_keys() function is used to send input, while the click() function simply clicks the UI element. This format will be the basis of most UI interactions.
Eventually, after repeating the accessibility ID discovery to find the right UI elements for making a post, this is what the script should look like:
from appium import webdriver
from appium.options.ios import XCUITestOptions
from appium.webdriver.common.appiumby import AppiumBy
from selenium.webdriver.support.ui import WebDriverWait
from selenium.webdriver.support import expected_conditions as EC

options = XCUITestOptions()
options.automation_name = 'XCUITest'

# Unique to device
options.udid = '00008120E2B0B8724249DA6D' # UDID
options.device_name = "appium-demo" # Name
options.platform_name = 'iOS'
options.platform_version = '18.3.1' # iOS version

# WDA settings
options.set_capability('webDriverAgentUrl', 'http://10.11.1.1:8100') # Services IP of Corellium device
options.set_capability('usePreinstalledWDA', True)
options.set_capability('updatedWDABundleId', 'org.appium.WebDriverAgentRunner')
options.set_capability('updatedWDABundleIdSuffix', '.xctrunner')

# App settings
options.bundle_id = 'com.facebook.Facebook' # Bundle ID of target application
options.set_capability('autoAcceptAlerts', True) # Automatically accepts permission requests

try:
    driver = webdriver.Remote('http://127.0.0.1:4723', options=options)
    print("Connected to Facebook")

    wait = WebDriverWait(driver, 60)

    email_field = wait.until(
        EC.presence_of_element_located((AppiumBy.ACCESSIBILITY_ID, "Mobile number or email"))
    )
    email_field.send_keys("example@example.com")
    print("Entered email")

    password_field = wait.until(
        EC.presence_of_element_located((AppiumBy.ACCESSIBILITY_ID, "Password"))
    )
    password_field.send_keys("password")
    print("Entered password")

    login_button = wait.until(
        EC.presence_of_element_located((AppiumBy.ACCESSIBILITY_ID, "Log in"))
    )
    login_button.click()
    print("Clicked login button")

    save_button = wait.until(
        EC.presence_of_element_located((AppiumBy.ACCESSIBILITY_ID, "Not now"))
    )
    save_button.click()
    print("Clicked on 'Not Now'")

    post_button = wait.until(
        EC.presence_of_element_located((AppiumBy.ACCESSIBILITY_ID, "feed-inline-composer-button"))
    )
    post_button.click()
    print("Clicked on post field")

    post_field = wait.until(
        EC.presence_of_element_located((AppiumBy.ACCESSIBILITY_ID, "composer-text-view"))
    )
    post_field.click()

    # Find the field again to enter text (becomes stale after the first interaction)
    post_field = wait.until(
        EC.presence_of_element_located((AppiumBy.ACCESSIBILITY_ID, "composer-text-view"))
    )
    message = "Hello World!"
    post_field.send_keys(message)
    print(f"Sent '{message}' in post")

    publish_post = wait.until(
        EC.presence_of_element_located((AppiumBy.ACCESSIBILITY_ID, "composer-right-button"))
    )
    publish_post.click()
    print("Published post")

except Exception as e:
    print(f"Error occurred: {str(e)}")
    print(f"Error type: {type(e)}")
There will be odd cases like the composer-text-view above, where it has to be found twice in a row to fully interact with it—for both clicking on it and sending input, as sending input and clicking immediately after each other wouldn't work due to the element being stale after its first interaction.
Also, the autoAcceptAlerts capability is present here, which automatically accepts iOS-level permissions requests (such as push notifications, access to contacts/calendars/photos, etc.) since you can't interact with them the way you can with other UI elements—they don't show up in Appium Inspector.
Publishing a Post
Start the Appium server on a local machine:
appium
In a different terminal, execute the script:
python3 facebook.py
You should see Facebook open and login, deal with permission requests and saving login details, then finally publish a public post.
With this example, you're now equipped to automate UI flows in complex apps like Facebook using Appium and Corellium. By leveraging Appium Inspector to discover the right accessibility IDs, you can create automation scripts that can reliably interact with real-world applications.
Automating Corellium Cafe with MATRIX and Appium
Now let's move on to a more complex automation scenario that integrates security testing. We'll use Appium to automate interactions with the Corellium Cafe app, a sample application that simulates a cafe ordering system. We'll also integrate MATRIX to monitor the network traffic during test execution.
Introduction to Corellium Cafe
Corellium Cafe is a demonstration app created by Corellium for security testing purposes. It allows users to:
- Browse a menu of coffee and food items
- Add items to their cart
- Complete the ordering process with payment information
This makes it an excellent test case for automation that involves form filling, menu navigation, and payment processing.
What If There's No Accessibility ID?
Accessibility IDs provide the most reliable and stable locators. However, when accessibility IDs aren't available, Appium offers alternative locator strategies.
XPath
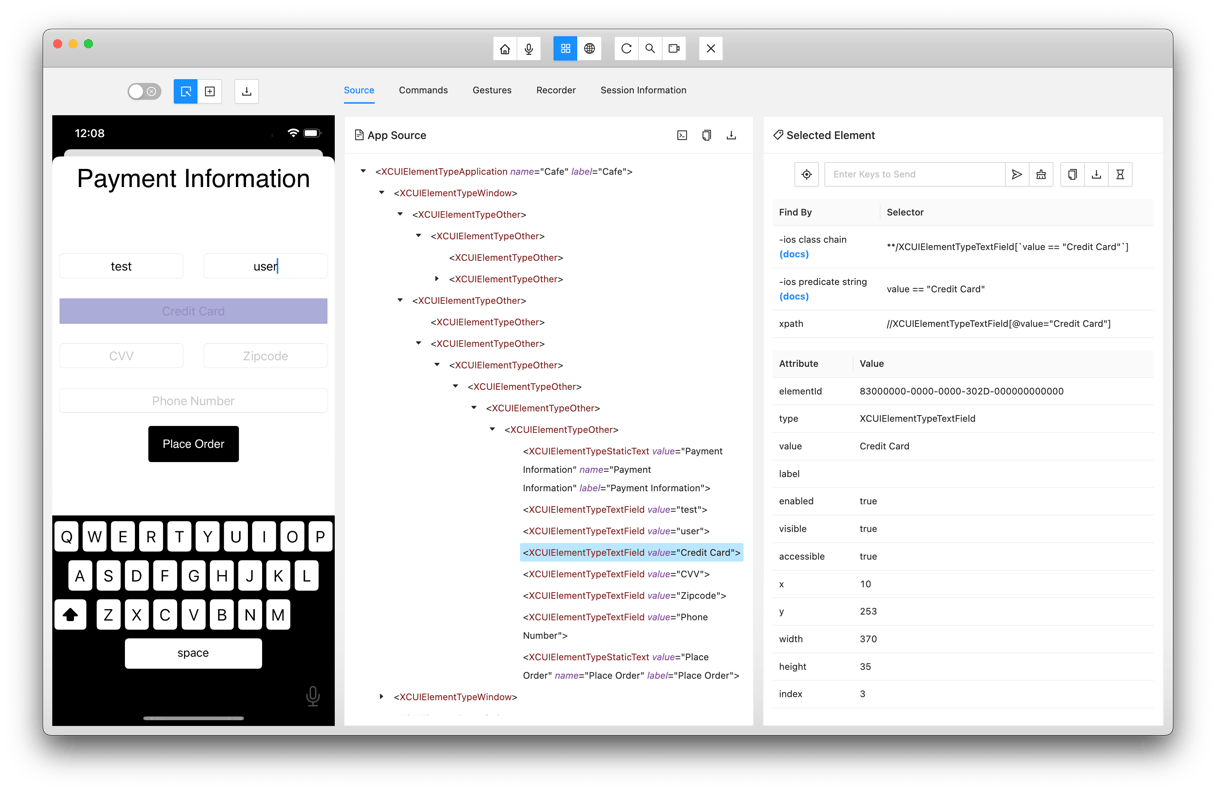
XML Path Language is another versatile locator strategy when accessibility IDs are missing. In Appium Inspector, we can take a look at the credit card field in Corellium Cafe:  In the payment information page, none of the fields have accessibility IDs. Instead, we can construct XPath expressions based on
 AppiumBy.XPATH:
credit_card_field = wait.until(
    EC.presence_of_element_located((AppiumBy.XPATH, "//XCUIElementTypeTextField[@value='Credit Card']"))
)
Beyond XPath, iOS automation with Appium offers specialized locator methods, which are also shown in Appium Inspector
Predicate String
iOS Predicate String is a native iOS locator strategy that uses Apple's NSPredicate syntax to filter elements. We can construct the credit card field based on AppiumBy.IOS_PREDICATE:
credit_card_field = wait.until(
    EC.presence_of_element_located((AppiumBy.IOS_PREDICATE, "value == 'Credit Card'"))
)
Class Chain
iOS Class Chain is a simplified iOS-specific syntax for locating UI elements by navigating through the app's interface hierarchy. We can use it to locate the credit card field with AppiumBy.IOS_CLASS_CHAIN:
credit_card_field = wait.until(
    EC.presence_of_element_located((AppiumBy.IOS_CLASS_CHAIN, "**/XCUIElementTypeTextField[`value == 'Credit Card'`]"))
)
Implementing Locator Strategies in Corellium Cafe
After exploring these locator stragtegies, let's put them into practice by creating an automated test flow for the Corellium Cafe app. The script will take a user through the entire ordering process, from browsing the menu to completing a purchase.
Eventually, after examining the app structure with Appium Inspector and identifying the locator strategies for each relevant UI element, this is what the complete script should look like:
# cafe.py

from appium import webdriver
from appium.options.ios import XCUITestOptions
from appium.webdriver.common.appiumby import AppiumBy
from selenium.webdriver.support.ui import WebDriverWait
from selenium.webdriver.support import expected_conditions as EC

options = XCUITestOptions()
options.automation_name = 'XCUITest'

# Unique to device
options.udid = '00008120E2B0B8724249DA6D' # UDID
options.device_name = "appium-demo" # Name
options.platform_name = 'iOS'
options.platform_version = '18.3.1' # iOS version

# WDA settings
options.set_capability('webDriverAgentUrl', 'http://10.11.1.1:8100') # Services IP of Corellium device
options.set_capability('usePreinstalledWDA', True)
options.set_capability('updatedWDABundleId', 'org.appium.WebDriverAgentRunner')
options.set_capability('updatedWDABundleIdSuffix', '.xctrunner')

# App settings
options.bundle_id = 'com.corellium.Cafe' # Bundle ID of target application

try:
    driver = webdriver.Remote('http://127.0.0.1:4723', options=options)

    wait = WebDriverWait(driver, 20)

    order_button = wait.until(
        EC.presence_of_element_located((AppiumBy.ACCESSIBILITY_ID, "Order"))
    )
    order_button.click()
    print("Clicked on order button")

    tea_button = wait.until(
        EC.presence_of_element_located((AppiumBy.XPATH, "(//XCUIElementTypeImage[@name='cup.and.saucer.fill'])[3]"))
    )
    tea_button.click()
    print("Clicked on tea button")

    add_to_card_button = wait.until(
        EC.presence_of_element_located((AppiumBy.XPATH, "//XCUIElementTypeButton[@name='Add to Cart']"))
    )
    add_to_card_button.click()
    print("Clicked on add to cart button")

    cart_button = wait.until(
        EC.presence_of_element_located((AppiumBy.ACCESSIBILITY_ID, "Cart"))
    )
    cart_button.click()
    print("Clicked on cart button")

    checkout_button = wait.until(
        EC.presence_of_element_located((AppiumBy.ACCESSIBILITY_ID, "Checkout"))
    )
    checkout_button.click()
    print("Clicked on checkout button")

    first_name_field = wait.until(
        EC.presence_of_element_located((AppiumBy.XPATH, "//XCUIElementTypeTextField[@value='First Name']"))
    )
    first_name_field.send_keys("test")
    print("Sent 'test' to first name field")

    last_name_field = wait.until(
        EC.presence_of_element_located((AppiumBy.XPATH, "//XCUIElementTypeTextField[@value='Last Name']"))
    )
    last_name_field.send_keys("user")
    print("Sent 'user' to last name field")

    credit_card_field = wait.until(
        EC.presence_of_element_located((AppiumBy.XPATH, "//XCUIElementTypeTextField[@value='Credit Card']"))
    )
    credit_card_field.send_keys("1234567890000000")
    print("Sent credit card details")

    cvv_field = wait.until(
        EC.presence_of_element_located((AppiumBy.XPATH, "//XCUIElementTypeTextField[@value='CVV']"))
    )
    cvv_field.send_keys("098")
    print("Sent CVV details")

    zipcode_field = wait.until(
        EC.presence_of_element_located((AppiumBy.XPATH, "//XCUIElementTypeTextField[@value='Zipcode']"))
    )
    zipcode_field.send_keys("20111")
    print("Sent zipcode")

    phone_number_field = wait.until(
        EC.presence_of_element_located((AppiumBy.XPATH, "//XCUIElementTypeTextField[@value='Phone Number']"))
    )
    phone_number_field.send_keys("5712711234")
    print("Sent phone number")

    place_order_button = wait.until(
        EC.presence_of_element_located((AppiumBy.ACCESSIBILITY_ID, "Place Order"))
    )
    place_order_button.click()
    print("Placed order")

    ok_button = wait.until(
        EC.presence_of_element_located((AppiumBy.ACCESSIBILITY_ID, "OK"))
    )
    ok_button.click()
    print("Clicked on OK")

except Exception as e:
    print(f"Error occurred: {str(e)}")
    print(f"Error type: {type(e)}")
Integrating MATRIX for Monitoring Automation Execution
Using the script above, we can combine it with MATRIX to monitor the network traffic during the test execution. MATRIX is particularly useful for security testing as it allows users to observe:
- HTTP/HTTPS requests and responses
- File system operations
- System calls
- Process creation and termination
The particular interest in this scenario is monitoring the HTTP request that contains the credit card information, which allows us to verify that sensitive data is being handled insecurely.
Using the Corellium API, we can incorporate MATRIX commands with our script to completely automate this process. First, we'll make a wordlist with the credit card number we chose:
Make a text file with the credit card number on your local machine:
echo "1234567890000000" > credit_card.txt
Install the Corellium CLI:
npm install -g @corellium/corellium-cli
Make a text file with the credit card number on your local machine:
echo "1234567890000000" > credit_card.txt
Login into the Corellium CLI:
corellium login --username username --password password --endpoint https://example.enterprise.corellium.com
Find your project and instance ID's:
corellium ls
The output should look something like this:
{
  "id": "a4e4a282-c79a-42f9-b2eb-8cf6f1fdcf6b", # Instance ID
  "name": "appium-demo",
  "key": "058cf8dfb407bbad0ccd40edd8338b3d4ac024de2a2a13d4889d4a93f745f6c4e553821ba6266df625b3a69a5ffa59e7afabab2dbc823ae0f7302aeb44229c0d",
  "flavor": "iphone14pm",
  "type": "ios",
  "project": "b8fc269f-ee86-4464-a191-e9c7de17fd00", # Project ID
  "state": "on",
  ...
}
Next, we'll create a test, start monitoring, start the Appium automation, finish monitoring, run the test, then examine the results on the web interface.
This is what your script should look like after incorporating the Corellium API:
import os
import delegator
import json
import re
import time
from appium import webdriver
from appium.options.ios import XCUITestOptions
from appium.webdriver.common.appiumby import AppiumBy
from selenium.webdriver.support.ui import WebDriverWait
from selenium.webdriver.support import expected_conditions as EC

# MATRIX setup
# os.environ['NODE_TLS_REJECT_UNAUTHORIZED'] = '0' # If using an on-premise Corellium installation with a self-signed certificate
project_id = 'b8fc269f-ee86-4464-a191-e9c7de17fd00' # Change to yours
instance_id = 'a4e4a282-c79a-42f9-b2eb-8cf6f1fdcf6b' # Change to yours

create_wordlist = f'corellium image create \
--project {project_id} \
--instance {instance_id} \
credit_card.txt extension plain ./credit_card.txt'

result = delegator.run(create_wordlist)
wordlist_id = (json.loads(result.out))[0]['id']
print('Created wordlist')

create_test = f'corellium matrix create-assessment \
--instance {instance_id} \
--bundle com.corellium.Cafe \
--wordlist {wordlist_id} \
--verbose true'

result = delegator.run(create_test)
match = re.search(r'"id":"([^"]+)"', result.out)
assessment_id = match.group(1)
print('Created test')

start_monitor = f'corellium matrix start-monitor \
--assessment {assessment_id} \
--instance {instance_id} \
--verbose true'

result = delegator.run(start_monitor)
print('Started monitoring\n')
time.sleep(30) # Wait for MATRIX to open app

# Appium automation
options = XCUITestOptions()
options.automation_name = 'XCUITest'

# Unique to device
options.udid = '00008120E2B0B8724249DA6D' # UDID
options.device_name = "appium-demo" # Name
options.platform_name = 'iOS'
options.platform_version = '18.3.1' # iOS version

# WDA settings
options.set_capability('webDriverAgentUrl', 'http://10.11.1.1:8100') # IP of Corellium device
options.set_capability('usePreinstalledWDA', True)
options.set_capability('updatedWDABundleId', 'org.appium.WebDriverAgentRunner')
options.set_capability('updatedWDABundleIdSuffix', '.xctrunner')
options.set_capability('autoLaunch', False) # For mitigating MATRIX and Appium conflict

# App settings
options.bundle_id = 'com.corellium.Cafe' # Bundle ID of target application

try:
    driver = webdriver.Remote('http://127.0.0.1:4723', options=options)

    wait = WebDriverWait(driver, 20)

    order_button = wait.until(
        EC.presence_of_element_located((AppiumBy.ACCESSIBILITY_ID, "Order"))
    )
    order_button.click()
    print("Clicked on order button")

    tea_button = wait.until(
        EC.presence_of_element_located((AppiumBy.XPATH, "(//XCUIElementTypeImage[@name='cup.and.saucer.fill'])[3]"))
    )
    tea_button.click()
    print("Clicked on tea button")

    add_to_card_button = wait.until(
        EC.presence_of_element_located((AppiumBy.XPATH, "//XCUIElementTypeButton[@name='Add to Cart']"))
    )
    add_to_card_button.click()
    print("Clicked on add to cart button")

    cart_button = wait.until(
        EC.presence_of_element_located((AppiumBy.ACCESSIBILITY_ID, "Cart"))
    )
    cart_button.click()
    print("Clicked on cart button")

    checkout_button = wait.until(
        EC.presence_of_element_located((AppiumBy.ACCESSIBILITY_ID, "Checkout"))
    )
    checkout_button.click()
    print("Clicked on checkout button")

    first_name_field = wait.until(
        EC.presence_of_element_located((AppiumBy.XPATH, "//XCUIElementTypeTextField[@value='First Name']"))
    )
    first_name_field.send_keys("test")
    print("Sent 'test' to first name field")

    last_name_field = wait.until(
        EC.presence_of_element_located((AppiumBy.XPATH, "//XCUIElementTypeTextField[@value='Last Name']"))
    )
    last_name_field.send_keys("user")
    print("Sent 'user' to last name field")

    credit_card_field = wait.until(
        EC.presence_of_element_located((AppiumBy.XPATH, "//XCUIElementTypeTextField[@value='Credit Card']"))
    )
    credit_card_field.send_keys("1234567890000000")
    print("Sent credit card details")

    cvv_field = wait.until(
        EC.presence_of_element_located((AppiumBy.XPATH, "//XCUIElementTypeTextField[@value='CVV']"))
    )
    cvv_field.send_keys("098")
    print("Sent CVV details")

    zipcode_field = wait.until(
        EC.presence_of_element_located((AppiumBy.XPATH, "//XCUIElementTypeTextField[@value='Zipcode']"))
    )
    zipcode_field.send_keys("20111")
    print("Sent zipcode")

    phone_number_field = wait.until(
        EC.presence_of_element_located((AppiumBy.XPATH, "//XCUIElementTypeTextField[@value='Phone Number']"))
    )
    phone_number_field.send_keys("5712711234")
    print("Sent phone number")

    place_order_button = wait.until(
        EC.presence_of_element_located((AppiumBy.ACCESSIBILITY_ID, "Place Order"))
    )
    place_order_button.click()
    print("Placed order")

    ok_button = wait.until(
        EC.presence_of_element_located((AppiumBy.ACCESSIBILITY_ID, "OK"))
    )
    ok_button.click()
    print("Clicked on OK")

except Exception as e:
    print(f"Error occurred: {str(e)}")
    print(f"Error type: {type(e)}")

# MATRIX finishing
stop_monitor = f'corellium matrix stop-monitor \
--assessment {assessment_id} \
--instance {instance_id} \
--verbose true'

result = delegator.run(stop_monitor)
print('\nStopped monitoring')

run_test = f'corellium matrix test \
--assessment {assessment_id} \
--instance {instance_id} \
--verbose true'

time.sleep(20) # Wait for monitoring to stop

result = delegator.run(run_test)
print('Ran test')
MATRIX and Appium Conflict
The previous demos rely on their respective Appium script to close the target application if it's already open, and/or start it before running its automation. This conflicts with MATRIX, as it opens the target application for its context and cannot be closed until after the test is done otherwise it will be corrupted.
To fix this, we can set the autoLaunch capability to false which assumes the app is open already:
options.set_capability('autoLaunch', False)
By implementing this, we can mitigate the MATRIX and Appium conflict that arises otherwise.
Running MATRIX and Appium
Start the Appium server on your local machine:
appium
Then execute the script:
python3 cafe.py
Once the script is finished executing, visit the MATRIX page in the tools tab:  Wait for the test to finish running. After it's done, you can examine the results and see that the credit card number is handled insecurely and found several times in different areas:
This combination of Appium automation and MATRIX monitoring demonstrates how effectively you can test both functionality and security in one workflow. By automating both the UI inputs and the tracking of sensitive data handling, you can quickly identify potential security vulnerabilities that manual testing might miss.
For App Developers: Optimizing Your Apps for Test Automation
If you're an app developer, you can significantly improve the testability of your applications by following certain best practices. This section provides guidance on how to make your apps more automation-friendly.
Implementing Proper Accessibility IDs in your Applications
Accessibility IDs are critical for effective test automation. They provide stable identifiers for UI elements that automation tools can reliably target.
Implementing something like shown below would be an example of what to do for incorporating Accessibility IDs in your app.
// Set accessibility identifier in Swift
let button = UIButton()
button.accessibilityIdentifier = "loginButton"

// Set accessibility label (helps with accessibility and testing)
button.accessibilityLabel = "Log In"
Troubleshooting Common Issues
Even with careful setup and coding, you may encounter issues when automating with Appium and Corellium. This section covers common problems and their solutions.
Device Not Found
Appium cannot find the specified device when executing the script. This is usually caused by not connecting to your VM with USBFlux, so ensure its connection. You can check if your local machine has access to your VM via libimobiledevice:
brew install libimobiledevice
Then run:
idevice_id -l
The output of that command should contain be the UDID of your Corellium VM if the USBFlux is connected.
WebDriverAgent
Communication with the WebDriverAgent fails with a connection refusal. This can be caused if you haven't mounted the Developer Disk Image (DDI), or if the VM just booted as watchdog violations can occur. Simply wait a few minutes before starting the WebDriverAgent IPA. You can verify it's running through curling the endpoint.
Techniques for Handling Timing Issues
Timing issues are among the most common causes of test flakiness. For most cases, simply extending the wait time should be sufficient:
wait = WebDriverWait(driver, 60) # 60 seconds
Also, implementing sleeps in between permission requests and an element in Appium like in the Facebook demo can be helpful so the script doesn't panic if it thinks it already interacted with the UI element, even if it didn't because of a permission and tries to interact with the next one in the script:
time.sleep(10)
Conclusion
Throughout this blog post, we've explored the powerful combination of Appium and Corellium for mobile application testing. From setting up the environment to automating complex real-world applications, we've covered practical approaches that can be applied to your own testing projects.
Summary of Key Learnings
Our exploration of the integration of Appium and Corellioum has highlighted several important insights. This combination merges a powerful automation framework with virtual device technology to create a flexible mobile testing platform. We've demonstrated its versatility by successfully automating both sample applications like Corellium Cafe and production apps such as Facebook, providing the approach's broad applicability.
The security testing aspect has been enhanced through integrating MATRIX, allowing us to monitor network traffic and system behavior during test execution—a critical capability for thorough security assessment. For app developers, we've outlined best practices to improve application testability through properly accessibility labeling and avoiding common implementation pitfalls. The troubleshooting techniques we've shared aim to create more reliable and maintainable test suites capable of handling any scenarios that arises.
Future Directions
Looking ahead, several promising directions exists for this technology combination. We can anticipate more sophisticated MATRIX capabilities for detecting subtle security issues through advanced analysis of network traffic and system behavior. Additionally, combining Appium automation with security testing tools open possibilities for creating automated penetration testing frameworks.
By implementing the techniques described in this post, mobile development and security teams can greatly improve their testing with the combination of Appium and Corellium serving as a powerful foundation.
Additional Resources
To further explore Appium and Corellium, here are some valuable resources:
- https://appium.io/docs/en/latest/
- https://appium.github.io/appium-xcuitest-driver/8.3/#
- https://discuss.appium.io/
- https://docs.corellium.com/
- https://www.corellium.com/matrix
Sample Scripts
Here are complete sample scripts demonstrated in this blog post: