
Step 1: Server Setup
GlitchChat Server requires Python 3.9.
From within the project root directory, create a virtual environment for the Python packages:
$ python3.9 -m pip install virtualenv
$ python3.9 -m venv ENV
$ source ENV/bin/activate
Then install the required packages:
$ pip install -r requirements.txt
Collecting amqtt==0.11.0b1 (from -r requirements.txt (line 1))
  Using cached amqtt-0.11.0b1-py3-none-any.whl (63 kB)
Collecting docopt==0.6.2 (from -r requirements.txt (line 2))
  Using cached docopt-0.6.2-py2.py3-none-any.whl
Collecting paho-mqtt==1.6.1 (from -r requirements.txt (line 3))
  Using cached paho_mqtt-1.6.1-py3-none-any.whl
Collecting passlib==1.7.4 (from -r requirements.txt (line 4))
  Using cached passlib-1.7.4-py2.py3-none-any.whl (525 kB)
Collecting PyYAML==6.0.1 (from -r requirements.txt (line 5))
  Obtaining dependency information for PyYAML==6.0.1 from https://files.pythonhosted.org/packages/0e/88/21b2f16cb2123c1e9375f2c93486e35fdc86e63f02e274f0e99c589ef153/PyYAML-6.0.1-cp39-cp39-macosx_11_0_arm64.whl.metadata
  Using cached PyYAML-6.0.1-cp39-cp39-macosx_11_0_arm64.whl.metadata (2.1 kB)
Collecting setuptools==69.0.2 (from -r requirements.txt (line 6))
  Obtaining dependency information for setuptools==69.0.2 from https://files.pythonhosted.org/packages/bb/e1/ed2dd0850446b8697ad28d118df885ad04140c64ace06c4bd559f7c8a94f/setuptools-69.0.2-py3-none-any.whl.metadata
  Using cached setuptools-69.0.2-py3-none-any.whl.metadata (6.3 kB)
Collecting six==1.16.0 (from -r requirements.txt (line 7))
  Using cached six-1.16.0-py2.py3-none-any.whl (11 kB)
Collecting transitions==0.8.11 (from -r requirements.txt (line 8))
  Using cached transitions-0.8.11-py2.py3-none-any.whl (83 kB)
Collecting websockets==10.4 (from -r requirements.txt (line 9))
  Using cached websockets-10.4-cp39-cp39-macosx_11_0_arm64.whl (97 kB)
Using cached PyYAML-6.0.1-cp39-cp39-macosx_11_0_arm64.whl (174 kB)
Using cached setuptools-69.0.2-py3-none-any.whl (819 kB)
Installing collected packages: passlib, paho-mqtt, docopt, websockets, six, setuptools, PyYAML, transitions, amqtt
  Attempting uninstall: setuptools
    Found existing installation: setuptools 68.1.2
    Uninstalling setuptools-68.1.2:
      Successfully uninstalled setuptools-68.1.2
Successfully installed PyYAML-6.0.1 amqtt-0.11.0b1 docopt-0.6.2 paho-mqtt-1.6.1 passlib-1.7.4 setuptools-69.0.2 six-1.16.0 transitions-0.8.11 websockets-10.4
$
Then run the server in the messaging-server directory:
$ cd messaging-server
$ python mqtt-server.py
On some platforms (macOS), this will show a prompt about accepting incoming network connections, click Allow.
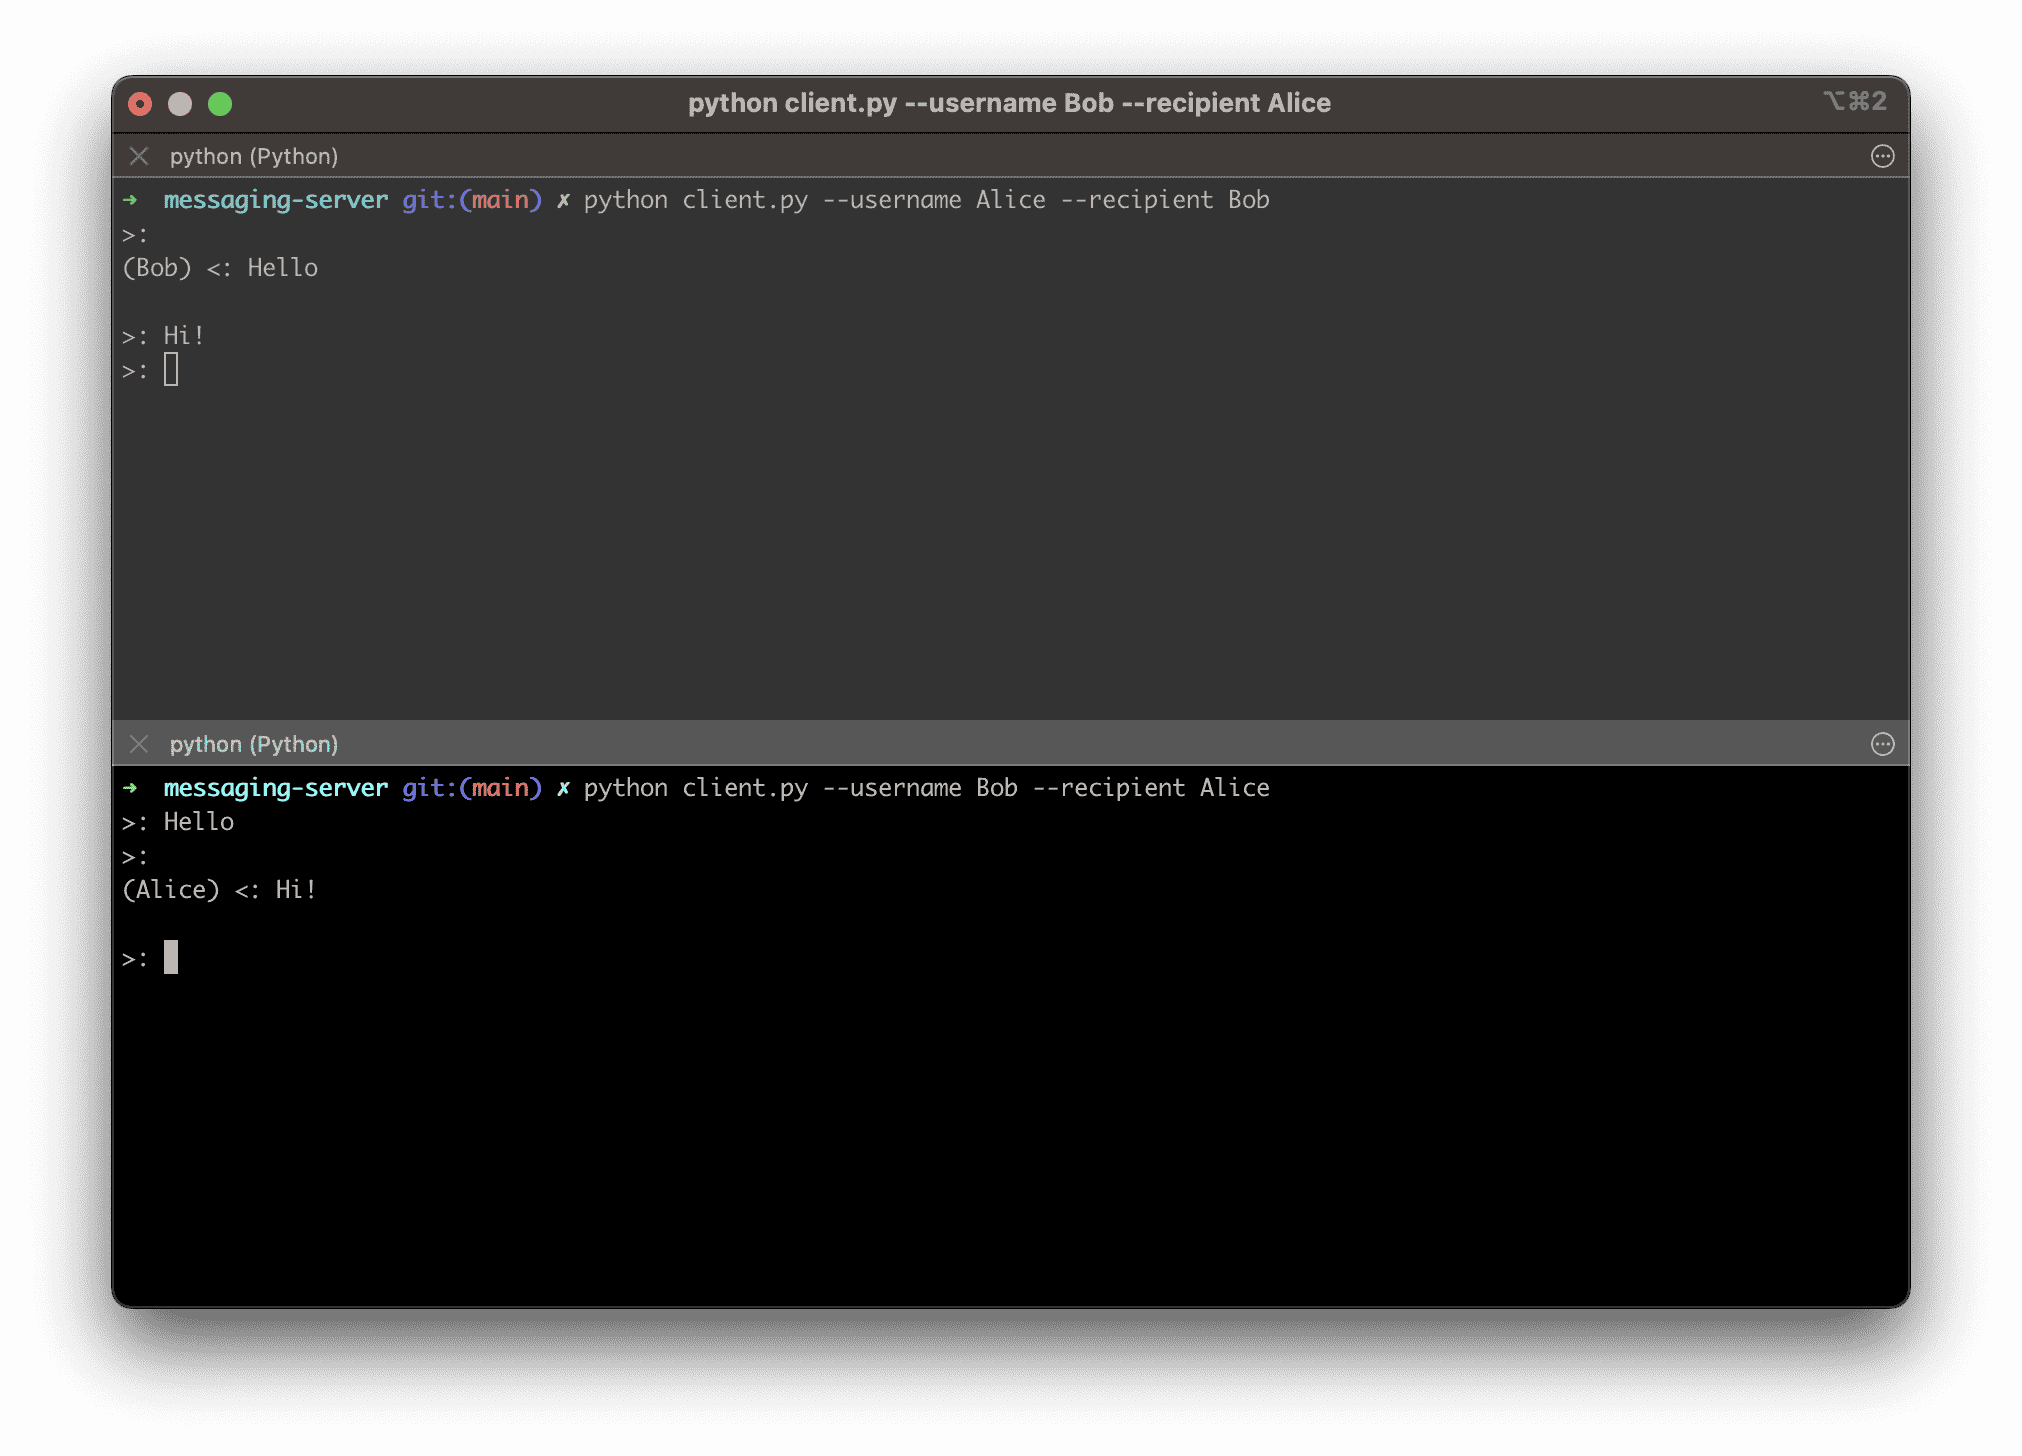
In another terminal, reactivate the virtual environment (source ENV/bin/activate) and run the client:
$ python client.py --username Alice --recipient Bob
>:
And finally in a third terminal, run again and swap the username and recipient:
$ python client.py --username Bob --recipient Alice
>:
Typing messages into one will show the contents on the other:
Step 2: Installation
-
Download the GlitchChat IPA. This is pre-built and signed, so it can be uploaded into the Corellium Apps tab directly.
-
Create a virtual iPhone. We recommend the iPhone 7 on the latest supported version of iOS. Select
Jailbrokenwhen prompted. -
After the device is created and fully usable, browse to the
Appstab and clickInstall App. Select the GlitchChat IPA from your local filesystem. -
Download the OpenVPN profile from the
Connecttab and connect to it with your OpenVPN client. Make note of the IP address
-
Once the application finishes installing, start it from the device’s home screen.

-
Launch the app and enter a username (e.g. Bob) and the IP address/port of your GlitchChat server (this should be a VPN address such as
10.11.3.4:1883) and tapConnect. On the first run, this will prompt for whether to allow local network connections, tapOK, then tapConnectagain.
-
Repeat the process with a different username (e.g. Alice) in a second VM, or use
client.pyas in 1 - Server Setup. -
Start a new chat between Alice and Bob and send messages back and forth.
Now that everything is working as expected, we’re ready to dig in and begin analyzing the application!
Step 3: Initial Recon
-
List of features
-
Native libraries
-
Files stored during normal operations
Static Analysis
First, we can start with the IPA itself. This is simply a zip file, so we can decompress it and examine its components.
$ unzip GlitchChat.ipa
Archive:  GlitchChat.ipa
   creating: Payload/
   creating: Payload/GlitchChat.app/
   creating: Payload/GlitchChat.app/_CodeSignature/
  inflating: Payload/GlitchChat.app/_CodeSignature/CodeResources
   creating: Payload/GlitchChat.app/MessageKit_MessageKit.bundle/
  inflating: Payload/GlitchChat.app/MessageKit_MessageKit.bundle/Assets.car
  inflating: Payload/GlitchChat.app/MessageKit_MessageKit.bundle/Info.plist
  inflating: Payload/GlitchChat.app/AppIcon60x60@2x.png
  inflating: Payload/GlitchChat.app/GlitchChat
   creating: Payload/GlitchChat.app/GlitchChat.momd/
  inflating: Payload/GlitchChat.app/GlitchChat.momd/GlitchChat.mom
  inflating: Payload/GlitchChat.app/GlitchChat.momd/VersionInfo.plist
  inflating: Payload/GlitchChat.app/GlitchChat.momd/GlitchChat.omo
  inflating: Payload/GlitchChat.app/Assets.car
  inflating: Payload/GlitchChat.app/AppIcon76x76@2x~ipad.png
  inflating: Payload/GlitchChat.app/Inter.ttf
   creating: Payload/GlitchChat.app/Frameworks/
   creating: Payload/GlitchChat.app/Frameworks/CocoaMQTT.framework/
   creating: Payload/GlitchChat.app/Frameworks/CocoaMQTT.framework/_CodeSignature/
  inflating: Payload/GlitchChat.app/Frameworks/CocoaMQTT.framework/_CodeSignature/CodeResources
  inflating: Payload/GlitchChat.app/Frameworks/CocoaMQTT.framework/CocoaMQTT
  inflating: Payload/GlitchChat.app/Frameworks/CocoaMQTT.framework/Info.plist
   creating: Payload/GlitchChat.app/Frameworks/MqttCocoaAsyncSocket.framework/
   creating: Payload/GlitchChat.app/Frameworks/MqttCocoaAsyncSocket.framework/_CodeSignature/
  inflating: Payload/GlitchChat.app/Frameworks/MqttCocoaAsyncSocket.framework/_CodeSignature/CodeResources
  inflating: Payload/GlitchChat.app/Frameworks/MqttCocoaAsyncSocket.framework/MqttCocoaAsyncSocket
  inflating: Payload/GlitchChat.app/Frameworks/MqttCocoaAsyncSocket.framework/Info.plist
   creating: Payload/GlitchChat.app/Frameworks/libpng.framework/
   creating: Payload/GlitchChat.app/Frameworks/libpng.framework/_CodeSignature/
  inflating: Payload/GlitchChat.app/Frameworks/libpng.framework/_CodeSignature/CodeResources
  inflating: Payload/GlitchChat.app/Frameworks/libpng.framework/libpng
  inflating: Payload/GlitchChat.app/Frameworks/libpng.framework/Info.plist
  inflating: Payload/GlitchChat.app/embedded.mobileprovision
  inflating: Payload/GlitchChat.app/Info.plist
  inflating: Payload/GlitchChat.app/PkgInfo
$
From just the file listing, we can derive a few useful bits of information:
-
The application uses Core Data for its data storage layer, which is revealed by the
GlitchChat.momddirectory and its contents. This implies that there will be a SQLite database, which might be a juicy target for post-exploitation. -
The
CocoaMQTTframework suggests that MQTT is used to send and receive the message contents. This is useful because it is straightforward to deal with this protocol in Python, so building a custom client for sending exploits will not be a problem. -
There’s an embedded
libpng. Typically, to deal with image formats such as PNG, apps will use the Apple-providedUIImageAPIs, which are backed by theCoreGraphicsframework, which is backed byImageIO(which contains its own, Apple-maintained copy oflibpng). The presence of a separate copy here suggests that there might be some customizations.
Since we know this app has some functionality related to AI-generated images, we can search for modifications to libpng:
$ cd Payload/GlitchChat.app/Frameworks/libpng.framework/
$ strings libpng | grep -i ai
aixx
aixx
lost/gained channels
%sin png_handle_aixx
%saixx_context sizes
%s  ai_callback: %zu
%saixx callback: %p
%saixx type: %p
%saixx extra_data: %p
%sAfter aixx callback
Read failure in png_handle_zTXt
zstream unclaimed
Insufficient memory for aixx chunk data
Memory allocation failed while processing sCAL
%sWriting trailer text chunk %d, type %d
%sin png_write_aixx
deflateEnd failed (ignored)
$
Perhaps some of these will be worth investigating as we progress…
Finally, it’s worth investigating the Info.plist, as this describes some of the app’s features. From the Glitchchat.app directory, run:
$ plutil -convert xml1 Info.plist
$ cat Info.plist
<?xml version="1.0" encoding="UTF-8"?>
<!DOCTYPE plist PUBLIC "-//Apple//DTD PLIST 1.0//EN" "http://www.apple.com/DTDs/PropertyList-1.0.dtd">
<plist version="1.0">
<dict>
	<key>BuildMachineOSBuild</key>
	<string>22G436</string>
	<key>CFBundleDevelopmentRegion</key>
	<string>en</string>
	<key>CFBundleExecutable</key>
	<string>GlitchChat</string>
	<key>CFBundleIcons</key>
	<dict>
		<key>CFBundlePrimaryIcon</key>
		<dict>
			<key>CFBundleIconFiles</key>
			<array>
				<string>AppIcon60x60</string>
			</array>
			<key>CFBundleIconName</key>
			<string>AppIcon</string>
		</dict>
	</dict>
	<key>CFBundleIcons~ipad</key>
	<dict>
		<key>CFBundlePrimaryIcon</key>
		<dict>
			<key>CFBundleIconFiles</key>
			<array>
				<string>AppIcon60x60</string>
				<string>AppIcon76x76</string>
			</array>
			<key>CFBundleIconName</key>
			<string>AppIcon</string>
		</dict>
	</dict>
	<key>CFBundleIdentifier</key>
	<string>com.corellium.GlitchChat</string>
	<key>CFBundleInfoDictionaryVersion</key>
	<string>6.0</string>
	<key>CFBundleName</key>
	<string>GlitchChat</string>
	<key>CFBundlePackageType</key>
	<string>APPL</string>
	<key>CFBundleShortVersionString</key>
	<string>1.0</string>
	<key>CFBundleSupportedPlatforms</key>
	<array>
		<string>iPhoneOS</string>
	</array>
	<key>CFBundleURLTypes</key>
	<array>
		<dict>
			<key>CFBundleTypeRole</key>
			<string>Editor</string>
			<key>CFBundleURLName</key>
			<string>com.corellium.GlitchChat</string>
			<key>CFBundleURLSchemes</key>
			<array>
				<string>glitchchat</string>
			</array>
		</dict>
	</array>
	<key>CFBundleVersion</key>
	<string>1</string>
	<key>DTCompiler</key>
	<string>com.apple.compilers.llvm.clang.1_0</string>
	<key>DTPlatformBuild</key>
	<string>21C52</string>
	<key>DTPlatformName</key>
	<string>iphoneos</string>
	<key>DTPlatformVersion</key>
	<string>17.2</string>
	<key>DTSDKBuild</key>
	<string>21C52</string>
	<key>DTSDKName</key>
	<string>iphoneos17.2</string>
	<key>DTXcode</key>
	<string>1510</string>
	<key>DTXcodeBuild</key>
	<string>15C65</string>
	<key>LSRequiresIPhoneOS</key>
	<true/>
	<key>LSSupportsOpeningDocumentsInPlace</key>
	<true/>
	<key>MinimumOSVersion</key>
	<string>14.0</string>
	<key>NSCameraUsageDescription</key>
	<string>Send messages with new photos taken with your Camera by allowing access.</string>
	<key>UIAppFonts</key>
	<array>
		<string>Inter.ttf</string>
	</array>
	<key>UIApplicationSceneManifest</key>
	<dict>
		<key>UIApplicationSupportsMultipleScenes</key>
		<false/>
		<key>UISceneConfigurations</key>
		<dict>
			<key>UIWindowSceneSessionRoleApplication</key>
			<array>
				<dict>
					<key>UISceneConfigurationName</key>
					<string>Default Configuration</string>
					<key>UISceneDelegateClassName</key>
					<string>GlitchChat.SceneDelegate</string>
				</dict>
			</array>
		</dict>
	</dict>
	<key>UIApplicationSupportsIndirectInputEvents</key>
	<true/>
	<key>UIDeviceFamily</key>
	<array>
		<integer>1</integer>
		<integer>2</integer>
	</array>
	<key>UIFileSharingEnabled</key>
	<true/>
	<key>UILaunchStoryboardName</key>
	<string>LaunchScreen</string>
	<key>UIRequiredDeviceCapabilities</key>
	<array>
		<string>arm64</string>
	</array>
	<key>UISupportedInterfaceOrientations~ipad</key>
	<array>
		<string>UIInterfaceOrientationPortrait</string>
		<string>UIInterfaceOrientationPortraitUpsideDown</string>
		<string>UIInterfaceOrientationLandscapeLeft</string>
		<string>UIInterfaceOrientationLandscapeRight</string>
	</array>
	<key>UISupportedInterfaceOrientations~iphone</key>
	<array>
		<string>UIInterfaceOrientationPortrait</string>
		<string>UIInterfaceOrientationLandscapeLeft</string>
		<string>UIInterfaceOrientationLandscapeRight</string>
	</array>
</dict>
</plist>
$
Save this file for later, as it may come in handy.
Filesystem Analysis
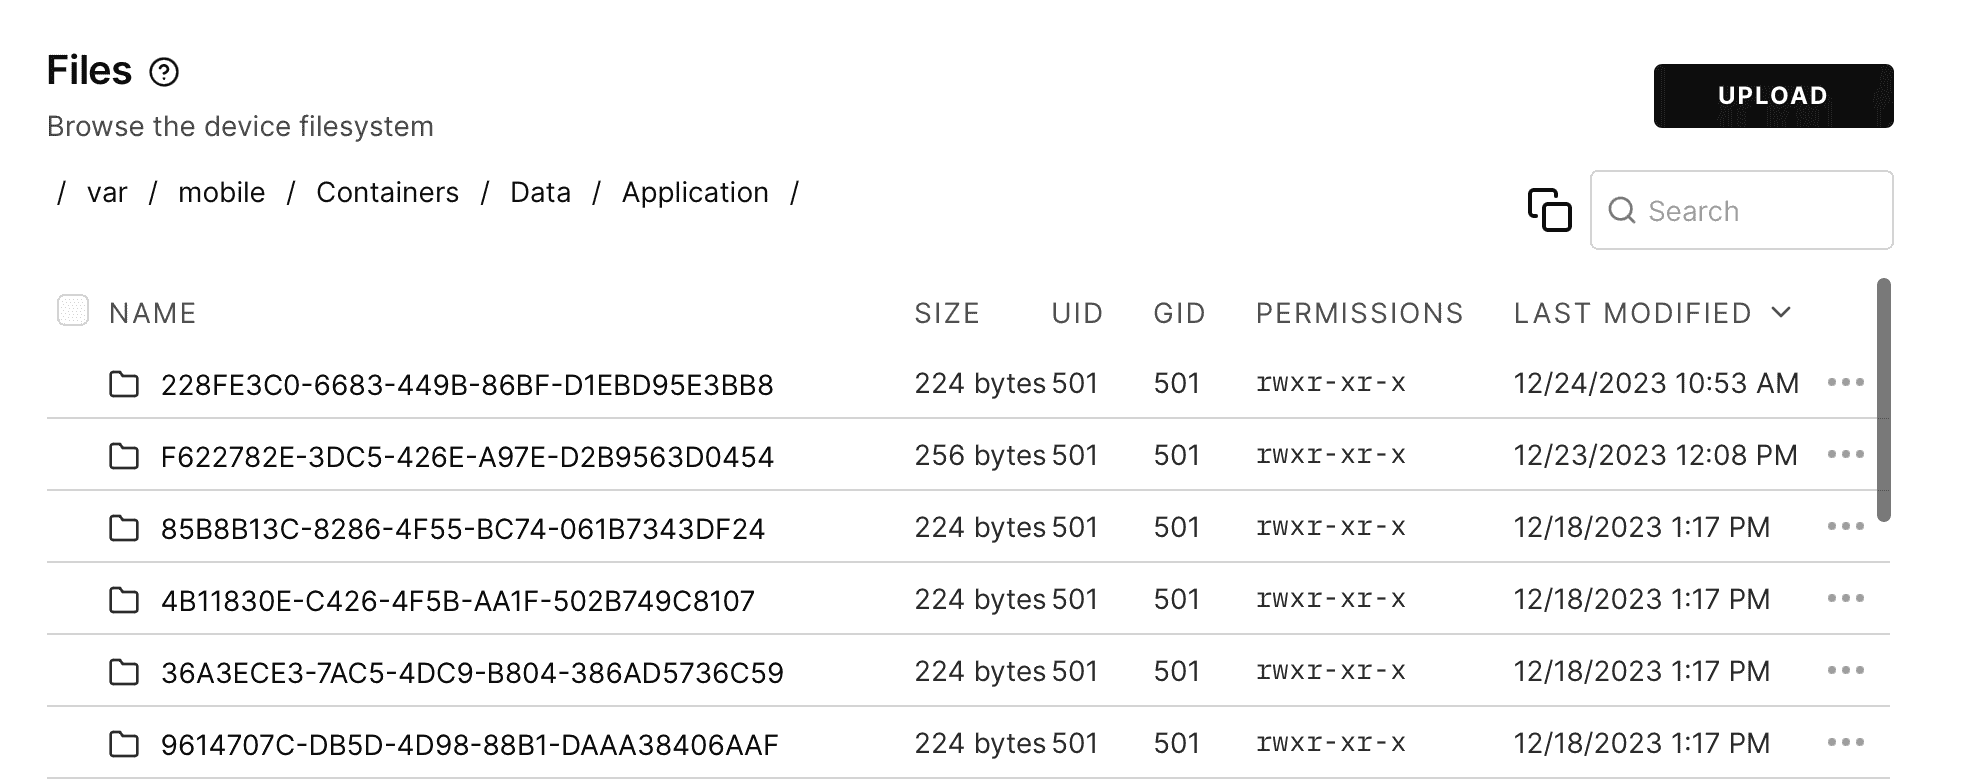
On the Files tab, we can browse to /var/mobile/Containers/Data/Application and see all of the container directories for the installed applications. If we sort by date to see the most recent first, the top item is most likely GlitchChat. Since they’re UUIDs, it can be tricky to find the correct directory on a VM with many apps and a lot of activity.
Another approach would be to switch to the Console tab and run:
iphone:/ root# find /var/mobile/Containers/ -name "GlitchChat.sqlite"
/var/mobile/Containers/Data/Application/228FE3C0-6683-449B-86BF-D1EBD95E3BB8/Library/Application Support/GlitchChat.sqlite
iphone:/ root#
Now that we know which container belongs to the app, we can start examining its contents:
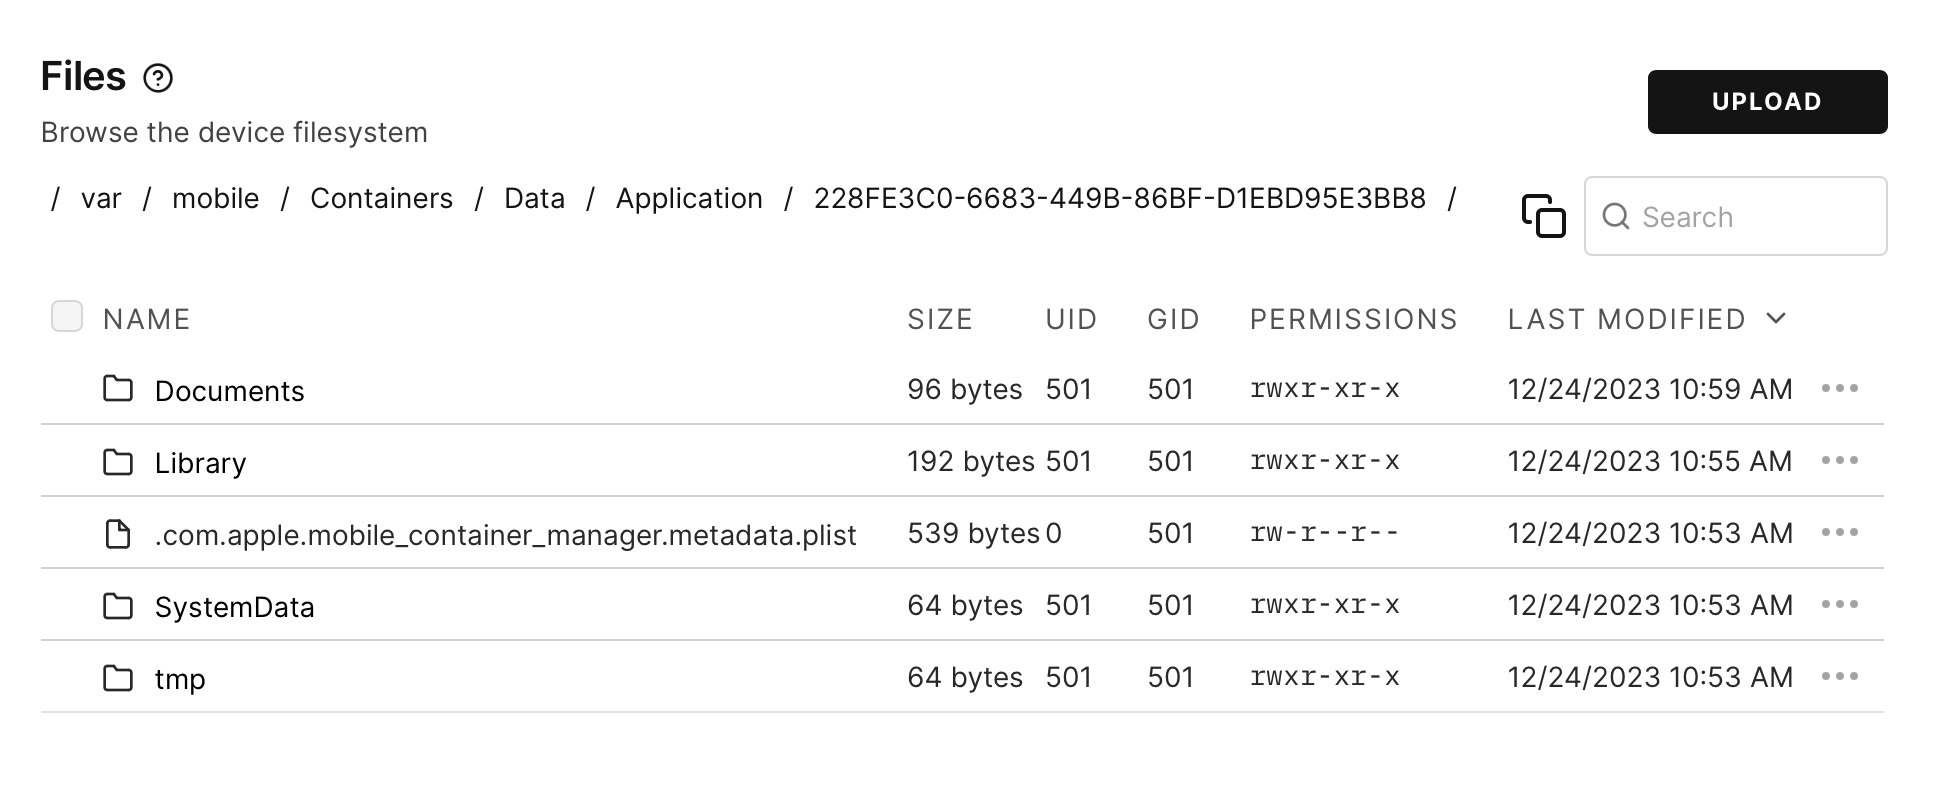
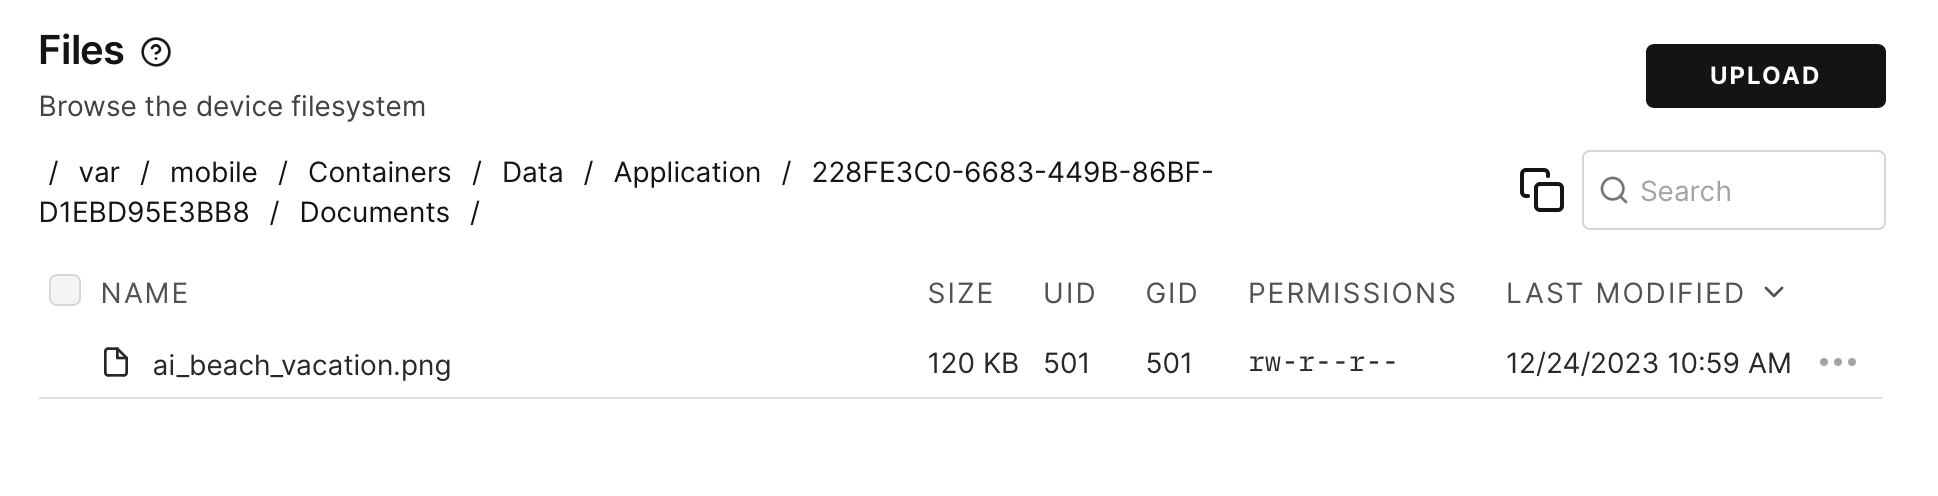
Typically, apps will store interesting data in Documents and Library/Application Support/. Inside Documents, we see any attachments that were sent to the user, in this case an image:
And under Library/Application Support/, the SQLite database that backs the app’s usage of Core Data:
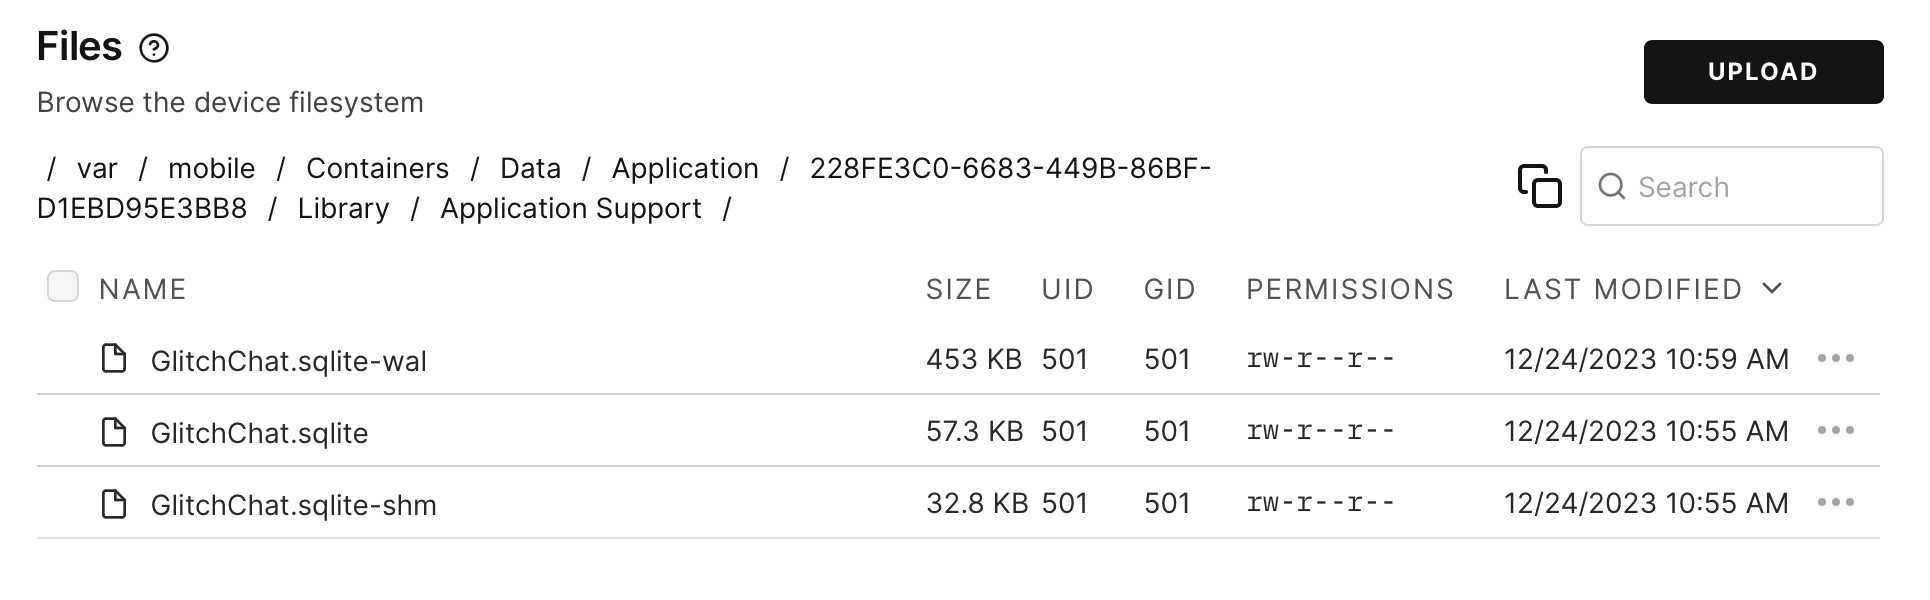
The SQLite database probably contains juicy information, so it’s a good candidate for post-exploitation…
Step 4: Network Analysis
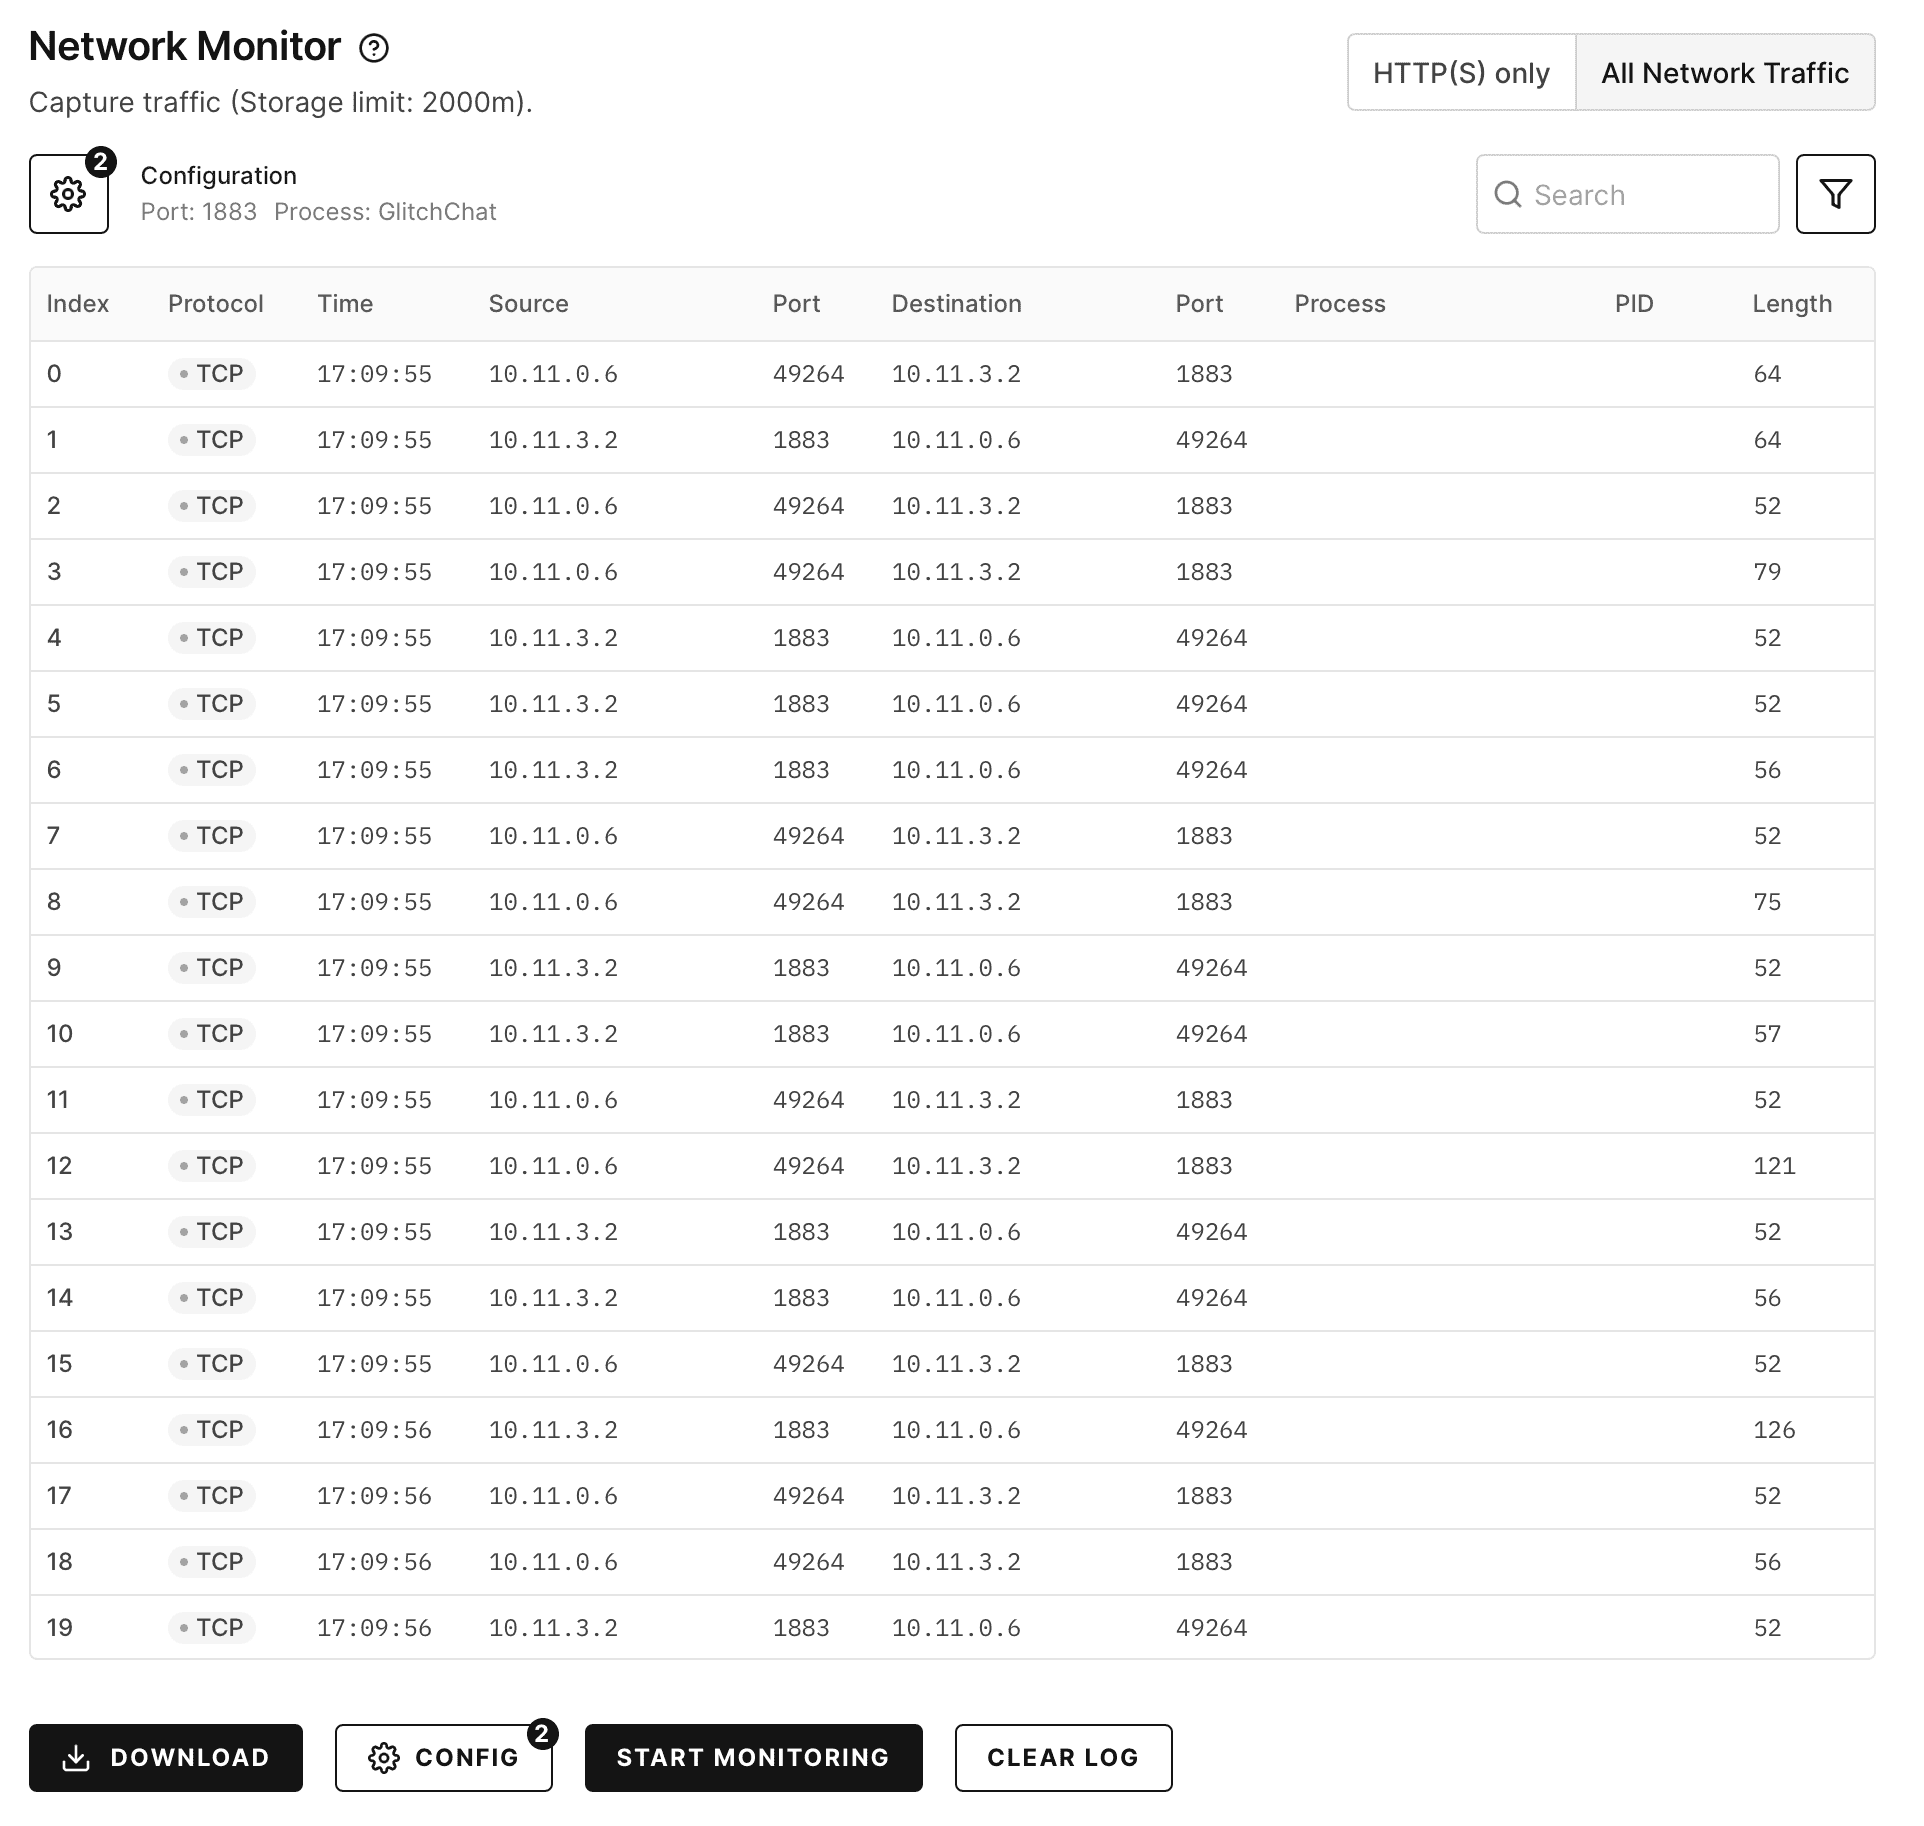
Using Corellium’s Network Monitor, we can see the structure of messages as they go over the wire. First, set the toggle to “All Network Traffic”, rather than “HTTP(S) Only”. Since we already know the server runs on port 1883, we know it’s not HTTP(S).
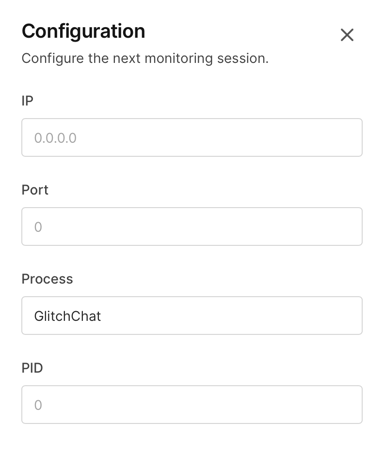
Then click the Configuration icon and set the Process filter to “GlitchChat” and port to 1883. Finally, click “Start Monitoring”.
Send some messages back and forth between two virtual iPhones, including sending an image, then return to the Network Monitor tab to see that some traffic has been collected:
Click the “Download” button to download a PCAP file, which contains the full contents of the traffic, and load into Wireshark.
From the list of packets, select one labeled “Publish Message” to see the content:
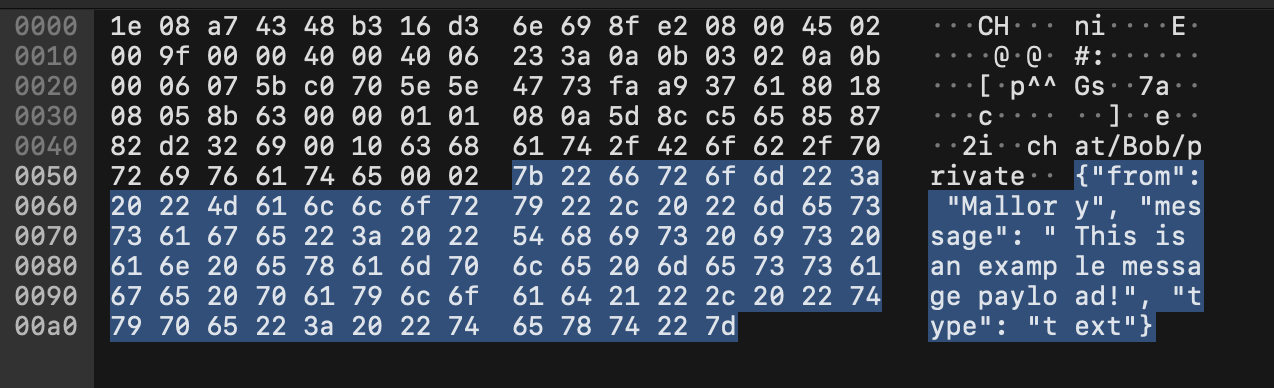
Clearly, the message format is JSON carried over the MQTT message queue protocol, with fields for the sender username, a type, and message content. Use the “Follow TCP Stream” feature by right-clicking on a packet (such as the Publish Message one from before) and selecting Follow->TCP Stream. This will show the entire session.
We can see that images are sent inlined into the JSON as a base64-encoded blob, along with some metadata:
{
    "from": "Mallory",
    "message": "<base64-encoded blob>",
    "filename": "ai_beach_vacation.png",
    "type": "image"
}
And also a response:
{
    "message":"saved image to \/var\/mobile\/Containers\/Data\/Application\/1ED8DF95-4B19-4853-916B-C3D52BCBEC27\/Documents\/ai_beach_vacation.png, AI result 4366762980","type":"ack-image",
    "from":"Bob"
}
This is enough to start building our own tools to send messages outside of the application and trigger vulnerabilities.